
Read time: 3 Min
Apple Mail and Microsoft Outlook are both desktop-based email clients used for sending and receiving emails. They both also allows user to store contacts, calendars, notes, journals, etc. While Apple Mail is the default email client for Apple devices, MS Outlook is the default email client for Windows systems. Apple Mail stores emails and other user data in MBOX format, while Outlook uses PST format. Users can’t directly transfer emails from one client to another as both formats are different. Sometimes, while switching systems for any other reason, users want to convert Apple Mail to PST format. To learn a simple method for MAC mail to Outlook conversion, follow the process shared in the article, but let us first learn various reasons why users migrate Apple Mail to PST.
Why Convert Apple Mail to PST?
Exporting Mac Mail email to PST gives the necessary flexibility and offers several benefits. Here are a few most common reasons:
- When a user switches platforms for any reason, like changing jobs, and wants to access emails stored in Apple Mail in the Outlook client.
- PST files store emails, contacts, calendars, and attachments in a single portable file that is easy to transfer.
- The PST format is best for creating a backup of all email data.
- PST can be accessed by users without an internet connection.
Manual Method to Convert Apple Mail to Outlook PST Format
Users can convert Apple Mail to PST format using Gmail, as it is a web-based email service, and can be configured in both email clients easily. This process can be performed in three steps:
Step 1: Configure Gmail Email in Apple Mail
- Open Apple Mail.
- Choose the Mail icon and select the Add Account option.
- Select Google and click Continue.
- Enter your Gmail Id login details and click Next.
- Grant permissions.
- Select the emails you want to migrate from the local folder in Apple Mail.
- Drop the files into a folder in Gmail.
Now the Apple mails are available in Gmail, in the next step we have to configure same Gmail in Outlook.
Step 2: Configure Gmail Account in Outlook
- Open MS Outlook.
- Click on File and select Add Account.
- Enter your Gmail ID and click Connect.
- A new window will appear; log in with your Gmail account.
- Click Allow on the Google permission window.
- Click Done to complete the process.
Step 3: Export Emails to PST Format
- Open Outlook again.
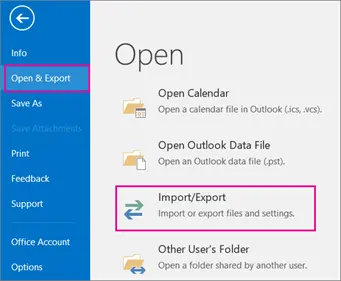
- Click on the File option.
- Now select Open & Export, click the Import/Export button.
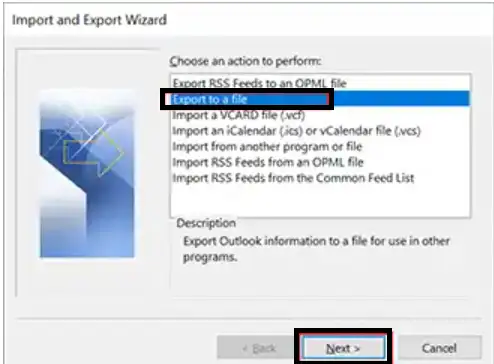
- Click on the “Export to a File” option and then click on the “Next” button.
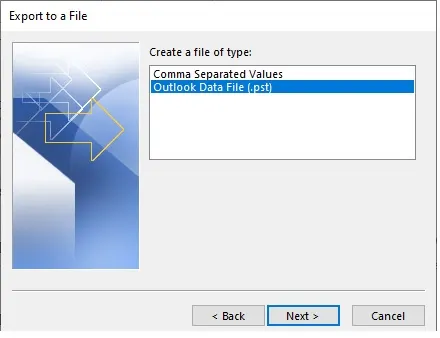
- Select the “Outlook Data File (.pst)” option and then click on the “Next” button.
- Choose the folder that has Apple Mail stored and click Next.
- Choose the location to save the PST file and click Finish.
Automated Tool to Export Apple Mail to PST
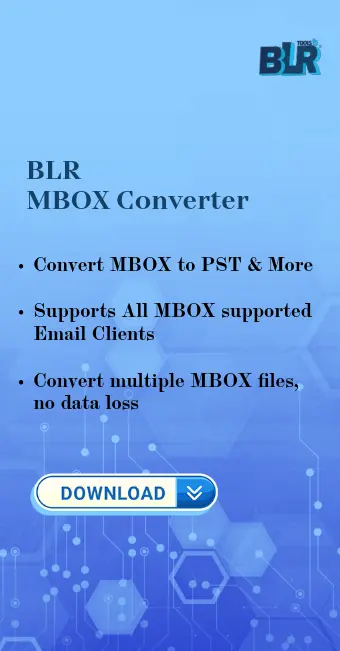
If the user has to perform the migration of multiple mailboxes, then the manual method is not suitable, as the user has to perform the recursive task for each mailbox separately. Here comes the need for an automated tool that can perform multiple mailbox migrations simultaneously. BLR MBOX Converter is one such proficient mbox converter tool that can migrate multiple mailboxes at a time, thus saving a lot of time. The software makes sure all emails with attachments, along with the original properties and formatting, are migrated to a PST file.

Benefits of using BLR MBOX Converter
This advanced software exports Apple Mail to an Outlook PST file with all attachments intact. The integrity of emails is maintained in the exported file, ensuring metadata and formatting remain intact without data loss. The other prominent features of software include:
- It supports converting single or multiple MBOX files simultaneously.
- Maintains the original folder structure.
- Provides users with the option to split large MBOX files.
- Convert MBOX emails to MSG, PDF, PST, EML.
- You can migrate MBOX to Office 365, Gmail. and all other IMAP server accounts.
Conclusion
In this article, we have learnt the manual and free method to convert Apple Mail to PST format. The manual methods is tedious process and require good technical knowledge, and there is a risk of data loss also. It is suggested to take the help of professional software as suggested above for risk-free migration.