
Read time: 5 Min
As we know, Microsoft Outlook is available for both Windows and Mac operating systems, but the mailbox data is stored in two different formats. While PST format is used for Outlook for Windows, OLM format is used for Outlook for Macintosh. When a user switches from Mac OS to the Windows platform, they face challenges accessing emails as both formats are different. Converting OLM to PST is suggested in such a scenario to access emails created with Mac Outlook in Windows platform. In this blog, we will discuss various methods to convert OLM to PST manually.
What is Needed to Convert OLM to PST?
There are various reasons why a user needs to convert OLM to PST. Here are the key reasons:
- Switching Platform: OLM to PST Conversion is necessary when a user switches from Mac systems to Windows.
- Backup & Archiving: PST files are secure and perfect for backup and archiving purposes.
- Compatibility: PST files can easily be shared and reused across multiple Outlook profiles.
How to Convert Mac OLM File to PST Manually?
There is no direct method to convert OLM emails to PST, but with some workarounds, we can achieve the task. Based on research, we have come to two methods that can be used to convert OLM file to PST manually.
Method 1: Configure Mac Outlook account in Windows Outlook
In this method user have to sync Outlook for Mac emails in Windows Outlook by configuring the Mac Outlook in Windows by following the steps mentioned below:
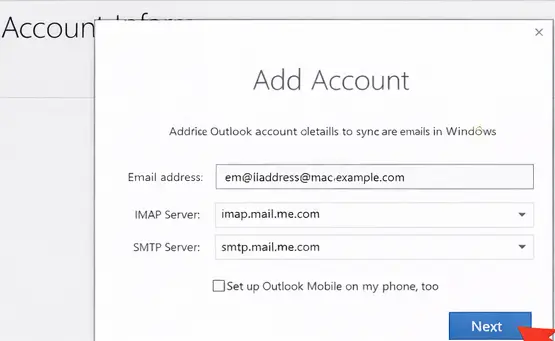
- Open Outlook and move to File.
- Click the Add Account option > Add Mac Outlook account details to sync Mac emails in Windows Outlook.
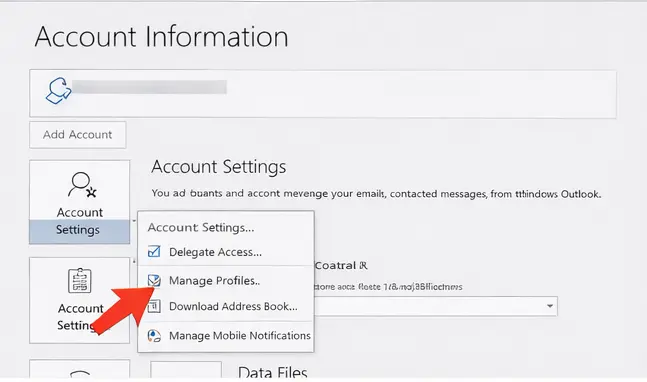
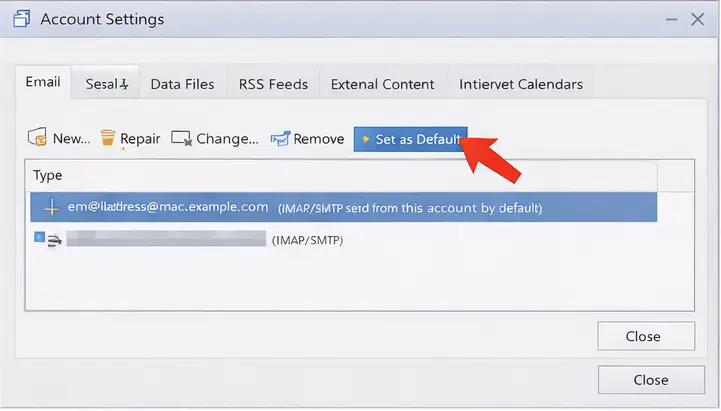
- Now, click File and double-click on the Account Settings option and select Manage Profiles option.
- From the Email section, make the newly added account the default. Now, Restart the Outlook.
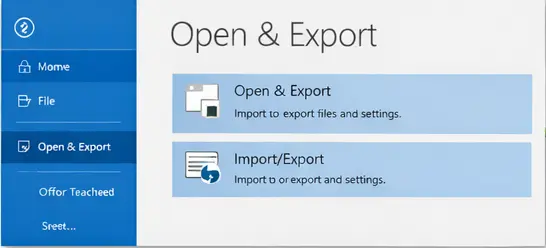
- Open Outlook again and click File.
- Click Open & Export > Import/Export option.
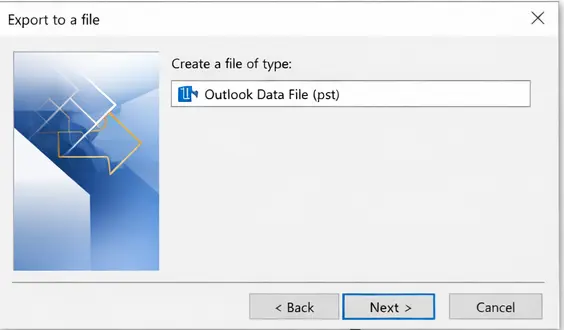
- Select the Export to a file option and click Next.
- Select the Outlook Data file(.pst) from the options available.
- Select the Folder you want to export.
- Save to the desired location
Method 2: Convert OLM File to PST Using Gmail
The user can also convert OLM to PST by configuring a Gmail account in Outlook for Mac and moving emails to the Gmail folder. After successfully moving emails to the Gmail folder, the same Gmail account can be configured with Outlook for Windows. The various steps involved are:
Step 1: Setup Gmail Account in MS Outlook for Mac
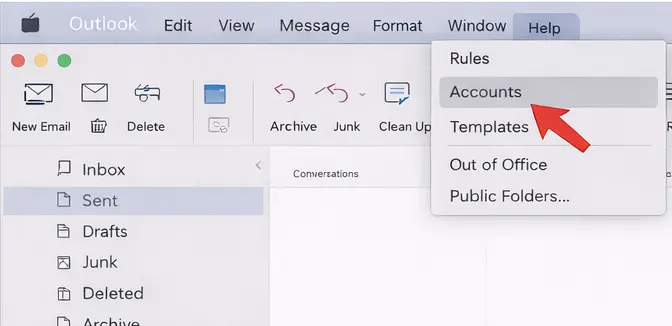
- Launch Outlook for Mac,
- Go to Tools, Select Accounts > Emails.
- Choose New Account from the Account Window
- Enter Gmail username and password
- Now drag and drop folders from Outlook for Mac to Gmail
Step 2: Configure the same Gmail to MS Outlook for Windows
- Open MS Outlook.
- Go to File > Account Info and Click Add Account.

- Enter your Gmail address and click Connect.
- Choose IMAP to sync your Gmail emails directly in Outlook.
- Enter your Gmail password and click connect
- Now drag and drop emails from your Gmail inbox to your Outlook folders.
Step 3: Export to PST File
- Open MS Outlook, Click File.
- Select Open & Export, and click Import/Export
- Select the Export to a file option and click Next.
- Select the Outlook Data file(.pst).
- Select the Folders you want to export to a PST file.
- Save the file to the location of your choice
In this way, the OLM emails are now saved to PST format.
Method 3: Convert OLM to PST Automatically
If you want a hassle-free solution for OLM to PST conversion, try using BLR OLM Converter software. The utility offers a safe and secure way to convert emails, contacts, calendars, and all other data from Mac OLM files to PST format with complete accuracy. This OLM to PST converter tool will preserve email attributes and maintain the entire folder hierarchy during the conversion process. You can try the demo version of the software to learn more about how it works.
Additionally, the software also convert OLM to CSV, PDF, MSG, TXT, and many other file formats. Download the demo version of the software to know how it works.

Conclusion
Users can convert OLM to PST using the manual methods discussed above. Follow the steps carefully to get the desired results. The manual methods involve various steps to be followed with precision.